
I channeled my friend Andrea this morning and decided to try a diamond fold card. Andrea is responsible for me spending $5,387 on scrapbooking paper, $739.17 on tools and organizers and another $8,634.75 on embellishments. Really. Or so my husband thinks. He adds funny though.
All pictures will enlarge if you click on them.
1) You will start with a piece of cardstock that is three times as long as it is wide. In this example, the paper is 12" wide by 4" tall. On the back, lightly mark the middle of the length with pencil. It doesn't show well here, but there is a mark at 6" on the white (back) side.


2) Remember being a kid and making cootie catchers and paper airplanes? This will be just as easy. With the back side showing so you can see your pencil line, fold the paper as shown, matching the long edge to the pencil line. The tool in the picture makes nice creases, but so does a credit card that is recuperating from holiday shopping.

3) Fold the left side of the paper in the same manner.

4) Open your paper and make the same folds from top to bottom this time.

5) When you've made both folds, it will look like this, sort of an arrow head with the diamond beginning to show from the first pair of folds.

6) Turn your paper right side up. Fold each end over to meet the point of the diamond (the intersection of the folds). Do this on both ends.


7) Turn your paper over again and bring each folded end to meet your pencil line again.


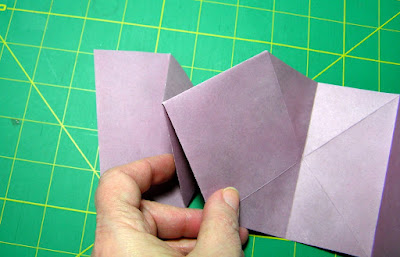
8) Almost done! The last folds you made in step 7 created mountain folds on the right side. Fold them the opposite way now, creating the valley fold that I am pointing at.

9) Here is where I will struggle a bit with description. Now that you have a valley fold running through the triangles that are formed on both top and bottom of either side of the diamond, you will fold those triangles along that valley fold. Do this on both sides.


10) Ta-da!

Add decorative paper or embellishments to the rectangles on the side and on the diamond. If you don't like the diamond popping up, it could be subdued into place with glue, unlike children.


I haven't decided if I am using the dragonfly paper and heart on this or not, so they aren't glued in place yet. Stretching the card open shows where you could write messages, add photos or other designs.

This card was made using a strip of paper 9" long by 3" high. The purple paper finishes to 3" square. I glued it to a 3 3/4" square of yellow cardstock. This prevents it from opening, but could be a cute package, place marker or glued to the face of a larger card.

Happy crafting!

1 comment:
I am soooooooooooo jealous of your blogging/computer skills!!!! As soon as this snow goes away for good, I am inviting myself over to your house for lessons on how to not be a techno-dummy :)
The cards are great! All you ever really needed me for was to give you a little push...
Glad you're back in the swing of posting :)
Post a Comment