I am relatively new to Copic Markers but already addicted. My first class was last September. I admitted my addiction here on my other blog. I would probably be further along on the learning curve if I didn't have other crafts competing for Copic time and oh yes...the occasional chores like laundry, housecleaning and cooking interrupt me too.
A class at my local scrapbooking store introduced coloring on something besides paper. We worked on a canvas board and a small muslin gift bag. The instructor had the board and bag stamped and ready for us before class. Both needed to be thoroughly dry before coloring. I believe she recommends overnight drying when fabric is involved. I don't know if the fabric would be washable or not, but for a small gift bag that wouldn't be a concern. I wouldn't plan to decorate clothing with anything but tried and true fabric paint.
Here is the canvas designed to go into a 4x6 frame. The bow and ribbon on the left were supposedly a design element but I would have preferred the stamped image to be centered and skip the ribbon. This particular image wouldn't be my choice anyway, so I doubt it will ever be framed and used.
The muslin gift bags were purchased in bulk from an online source. A square of Copic paper was inside the bag as we colored. For those unfamiliar with Copics, they are alcohol based and bleed through paper and fabric quite easily. Specific papers are recommended for coloring, and even with them we color on top of scrap paper or a protected surface.
I was very light handed in my color application and did not have color bleed through to the paper inside. The woman across from me colored intensely and her result was just as attractive while entirely different.
Colors used were RV10, RV13, RV14, V04, V06, B00, B02 and B05 for the flowers with Y18 centers. Leaves were YG01, YG03, YG05, YG25 and G17.
Almost invisible in this photo is B0000 in the background around the flowers, leaves and stems.
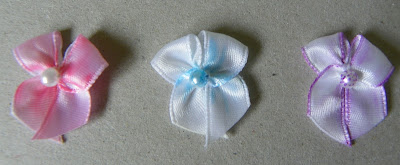
This morning I experimented with coloring ribbons bows from a package of embellishments. The pink one has two shades of pink. On the middle one, I used blue and colorless blender and colored the 'pearl' center. If you weren't aware of this, clear rhinestones can be colored any shade you like. The rhinestone centers in the purple flowers of the gift bag above were clear until I used the yellow marker. On the bow to the right, I colored the edge of the ribbon purple and used blender to pull a hint of color into the body of the ribbon. I drew dots on the pearl.


1 comment:
I checked into these after you mentioned them the first time, as they are so beautiful and I thought Wallene would do well with them. [Who am I kidding, I wanted them too. hee]
But girl, they are expensive. I about chocked. I think for the basic rainbow colors [8] would cost me the equivalent of an Ozcarz car payment.
Nice. And your work is gorgeous.
I am waiting on hitting the lottery. ::wink::
Love you!
Post a Comment